Thursday, December 17, 2009

Position Paper on Sustainability

Our final assignment for the 601 Green Methodologies course was to write a 10+ page position paper on sustainability. This was very open ended, but had to include what sustainability means to me. I chose to write about my hometown, Renovo, and the possibilities of building green in rural areas as opposed to urban centers.

I was able to get a good interview with David La Fontaine, Program Director at Community Ventures. They are a non-profit developer in in Philadelphia, working mainly on revitalization and development projects. He talked about their mission to partner with neighborhood organizations to best focus their efforts, how they operate, where they find financial assistance, and what it's like working with builders and architects.

Then I outlined a project proposal for a vacant lot in Renovo, did some quick designs for modest single-bedroom homes, and considered all of the materials and costs to build. The goal was to minimize building costs through simpler methods and efficient materials. After a pricing breakdown, I came to the conclusion that some form of assistance or subsidy is necessary to provide these at the price that they could sell at.

This was both fun and challenging paper, so if you have the time, give it a read and let me know what you think. Download paper

Thursday, November 19, 2009

Custom Concrete Counters: A Learning Process

I promised a detailed wrap-up of the custom concrete counters I created for the lounge in Lancaster. The plan was to create custom concrete counters for the cafe area, where we can use one as a sales and service area, and the counter across the wall will act as the work area. Our overall budget for this was very tight, around $3500 for materials and my labor. Lastly, this was my first time doing anything like this, so I figured let's just go to town on it and learn as we go (it's more fun that way).

Step 1. Drawing and Layout
We knew what we wanted, but had no idea of the size relative to the room. We started by outlining the work area in painter's tape on the newly installed hardwood floor (see earlier posts). After seeing how the space worked, I attacked Google SketchUp and came up with a concept for it.

Step 2. Build Basic Structure of Counters
OK, my amateur rendering looked great! Or so we thought...Turns out, the scale was way off. Anyhow, I figured I'd just start building it because I can visualise things much better when I'm making them (duh!). Head to Lowes and picked up our basic materials:
  1. 2 sheets OSB for the top and bottom frames
  2. Around twenty or so 8' 2"x3" boards
  3. 4 sheets nicer Ply Sheathing, for the face of the cabinets where they'll get abused
  4. Misc. multi-purpose drywall screws
  5. around 15 8' 1"x4" (Why you ask? Concrete tray...You'll see)
Since I don't know how to build counters and I do know how to frame a house, that's just what I did. I wanted to make these strong enough to support the concrete tops. 16" centers and one thing leads to another and here's what the frames look like:

One thing that turned out to be a challenge was building the concrete tray/lip for around the edges (with the 1"x4"!). I wanted the concrete to completely wrap around the top OSB board, and hand around the lip so that it looked like a floating slab. With around 3" on the edges, the concrete would be just over 2" everywhere else. Notice the cool recessed area for where we plan to put a cash register? This way we can bolt it down and it will be accessible yet hidden. Also, we had to caulk all of the inside of the concrete tray to account for any wet concrete slurry that might come through.

Step 3. Pouring the Concrete Tops
Now we have our forms in place. If you're going to do something like this I would suggest making them where they will stay permanently. After we add the concrete to the tops, they get extremely heavy and you'll need a team to move one. We went back to Lowes and got:
  1. Chicken wire (small scale mesh rebar)
  2. 2' Rebar sections to place in high-stress sections (corners and overhangs)
  3. A few bags of Fiber-reinforced concrete mix.
  4. A few bags of finer-finish concrete
Below you can see us adding the wire, and then adding the fiber-reinforced concrete. This was built up in the centers and below the mesh. The fiber is more resistant to cracking, but it doesn't finish as smoothly as the other concrete. Thus the two types. We molded the fiber-cement to stay away from all of the edges, where we filled with the other.

You'll want to screed the excess concrete with a straight piece of wood. Then, Because I wanted a smooth surface along the face of the concrete, I used a vibrator to push out the air bubbles. I didn't have a professional concrete vibrator, but being resourceful, a blade-less sawzall will do the trick.

Let this sit for around 2 or 3 hours, then finish with a steel float. Cover, and let cure for 36-48 hours. Once the concrete has cured, you can CAREFULLY remove the forms around the lip, and voila!


Step 4. Wet Grinding Our Way To A Beautiful Finish
The counters are not done, oh not by a long shot. They currently feel like a sidewalk or other finished concrete surface. But what we're going for here is a countertop (a safe and sanitary one at that and it needs to be able to be cleaned). So, this is where the craziest step in the whole process lies: the wet grinder. What is a wet grinder? It's a grinder like you're used to, but with a hose that allows water to flow through the middle of the wheel for cooling of the diamond pads that we're using. If you go to do this, know that it will be VERY wet. We covered the floors and walls with tarps to protect them, but we had no idea how long this would take or how much water would be used. Let's just say, over the course of 4 hours, using varying degrees of wet grinder pads, we dumped the equivalent of a 55-gallon drum of water on the project. That's a lot of cleanup! Unfortunately, this was so messy I didn't get the camera out much. Here's the photos, notice the glassy reflective surface:


Step 5. Not Done Yet! Seal and Wax
Sadly, this is the one area that I wish I could do again. As the counters dried after the wet grinding, we realized they returned to their light gray color. There are mulitple ways recommended on how to seal the concrete counters for use. The options are usually between using an epoxy clear-coat sealer or a water-based sealer. We chose the water-based sealer because it was (a) cheaper, and (b) less-toxic and would dry much quicker. After application however, it never gave us that wet glassy look like above. It was more of a damp, semi-reflective look. Oh well.

Once that dried over a few days, we then applied the last step: Wax Polish. We ordered CHENG Concrete Wax and applied as directed with a buffer. This was a bit tricky, but once it was buffed out, we got more of that reflective, glassy-smooth result we were looking for.

Step 5. Now Finish The Rest Of The Counter
Now that our concrete counter top is complete, I built the rest of the units. One unique thing we added was custom lighting to the front of the counters to mimic the lighting already in the cafe. A bit of paint, trim around the edges, and we can call this a finished project!

If you have any questions or comments, I'd love the hear them! This was a fun project and I hope this will help you if you ever want to build you own cheap and durable concrete counters.

Tuesday, November 17, 2009

Getting Involved: EGB and the DVGBC

Highly encouraged by my peers in the MSSD program, I recently joined the DVGBC to get a bit more involved in the events in the area, specifically the Emerging Green Builders Committee (EGB). The Delaware Valley Green Building Council's mission (DVGBC) "is to transform the Delaware Valley through sustainable and environmentally responsible planning, design, construction and operation of the region’s buildings, landscapes, cities and communities, mindful of the legacy left for future generations."

This should lead to more local involvement on my part, more connections within the industry, better knowledge of events, and hopefully some better blog material. The Green Home Tour I attended this spring was put on by the DVGBC.

If you'd like to get involved, Visit the DVGBC to sign up

Don't Forget Embodied Energy

How often are you told about sustainably harvested bamboo or other flooring or other materials from across the globe that ends up in local buildings. While those products are usually great products, the energy expended to bring them into your house probably greatly offset the benefits of using it. Or how about the everyday common sense decisions we make that we think are better for the environment, do we actually know how much energy is used to create these? By quantifying the products in our lives through their Embodied Energy, we are able to compare products on a level field.

Let's back up a step here. Embodied energy is the sum of the energy that was used in the work of making a product over it's complete life cycle. This sum includes the energy used for raw material extraction, transport, production and assembly, installation, deconstruction and disposal. This sum can be quantified, and them compared across products. Doing so if a bit of a challenge for an everyday consumer, but just being aware that a thing can be done should open your eyes and let you question things a bit more.

Why should you be concerned?
This is a great factor in determining if a product or service truly is green. While you may have thought that your new bamboo floors are green because they were advertised that way, the material is actually very hard to process. The energy expended to create those floors overshadow the end product. Local, privately owned forests can often produce a high-quality product, and deliver it with less energy and comparable cost.

So here's a simple question: Which is better for environment? A Ceramic cup/mug, a Paper cup, or a Styrofoam cup?
At first glance, many of us in my Green Materials class assumed a ceramic mug would be the best product. But it gets more difficult when we start crunching the numbers on each products estimated life cycle analysis. We took cost to make, cost to re-use, energy per usage. The results are that it depends on the usage. To be more efficient than a paper cup, you must use your ceramic cup at least 39 times. To be more efficient than a Styrofoam cup, you must use your ceramic cup at least 1,006 times! That's once every day at work for 4 years!

How long have you had your mug? What else in our lives do we easily overlook?

Thursday, October 22, 2009

Can Good Design Change A Community?

I've been wondering if it is possible to change a community through design alone.

Imagine small town USA, not ripe with development, or even an economically depressed area with high drug, crime, and unemployment rates. There are issues with kids dropping out of school, vandalism, theft. People dream of getting out. There isn't much of a sense of pride shared by the community. Sound like anywhere you know of?

Is it possible to make these people feel differently about their community through the addition of strategically placed, well-designed, sustainable homes and buildings?

Can you lower drug, crime, and unemployment rates?

Can you instill a sense of pride that transcends the immediate buildings and into the community?

I had a conversation with my professor about this and I'm going to make this the core of my semester thesis. I think the answer is Yes, and that this will be very exciting to study and experiment with. This idea must be proven true for sustainable design to catch on to be more than a niche market. Sustainable design means so much more than being green or efficient, it should improve how people feel and interact with their environment and with each other. It may sound like an idealistic hippie trip, but I think this can be proven and argued. I'll be gathering the data and be posting what I find.

Friday, October 16, 2009

Modular Construction is Essential for a Sustainable Future


A discussion panel entitled What’s Next in Green Design: Factory Built Architecture hosted at the Build Green Conference looked at the current state of modular construction from the perspective of three separate industry professionals; Pat McDonald from the Onion Flats, Scott Kelly from Re:Vision Architecture, and Rick Terry from Pennsylvania College of Technology. What was interesting about this panel was the three different visions these men have for the future. Download discussion as mp3

Pat McDonald's Onion Flats focuses on the rectangular cell and maximizes it for an urban, flexible building. His projects are about as modern and efficient as we've seen, and their price-tags easily top 500k.
Download presentation

Scott from Re:Vision focuses on the design and thought process, finding the perfect solution for each project. He says each project is unique and will have unique solutions. I couldn't agree more. I was able to walk through his Bancroft Green project earlier this year, and the building lot posed a lot of challenges.
Download presentation

Finally, Rick Terry has long been a Director of Factory Built Housing, and argues that efficient production lines can create great homes. These are standard fiberglass insulation and stick built assembly. Rick's modulars are usually single family, single story homes. He was taking a beating in the urban modular conversation, but I have to stand up for him: The product he's delivering for rural Pennsylvania is perfect for the market because costs are lower and land ownership is plentiful.
Download presentation

Of course modular construction has many benefits over conventional site-built structures. Building modular on assembly lines or off site brings these benefits:
  • Waste reduction up to 90% compared to site-built
  • Increased product delivery time, sometimes out the door in as little as 2 weeks
  • Controlled environment prevents moisture
  • Cost savings through centralized production lines
  • Reduction in carbon footprint - less travel and wasted energy
  • Higher quality control
I hope to learn more about modular over the course of this program, hopefully getting a chance to talk further with Onion Flats and Re:Vision Architecture. These are progressive projects that are creating better housing options. Having a higher quality of housing (not always more $) creates a sense of well-being, leads to social equity, and builds strong communities. This should convince anyone who hasn't looked into modular to at least consider it for their next project.
PowerPoint presentations were copied from the Build Green website.

Sunday, October 4, 2009

Social at 100k House

Two MSSD students who bought the 100k house had a back-to-school/housewarming jam at their place last night. The 100k house by Postgreen over in the E. Kensington neighborhood of Philadelphia is a really cool project I've been following for almost a year. From their site:
100k house is slated to be the first LEED Platinum, single-family home in Philadelphia and the state of Pennsylvania. Postgreen is also investigating the possibility of the 100K House as being the most affordable LEED Platinum home ever built in the world.
Having Avery and Claire invite everyone over was a great opportunity to see the project first hand, and get to know some of the other students. I wasn't able to show up until late because ofthe Phillies game, around 9pm, and at that point the party was in full-swing.

The house what I expected, but maybe a little more rough around the edges than I pictured. You can see that it's still a work in progress for the developer as they had quality control issues with things like drywall finishing, and a lot of the standard fine finishing were omitted to make the home affordable, which I think most of us would be perfectly fine with. It is really great to see what it's like to live in one of these modern green homes, with a few friends over to see how the space and flow of the house comes together.

One of the interesting networking opportunities that was new to me is Green Drinks. A few of the students frequent the event and have made some pretty good connections from it. I'll definitely try to add it to my schedule.

Sunday, September 20, 2009

Will Web Design Skills Transfer?

Thinking about my abilities within the sustainable design profession, I need to define who I am by focusing on what I am good at: Aesthetics. These skills are directly related to my current professional job as a web designer specializing in online app and user interface (UI) design. I'm always concerned about what the consumer wants to do, what the user is expecting, and how to naturally guide them through a virtual environment.

How well will these skills translate to Sustainable Design?
I've always had an appreciation for the skills I acquired on the construction job site. I can't say I've felt the same way about the skills I've acquired from sitting in front of a computer screen. However, I've slowly been fine-tuning my eye to catch inconsistencies and confusing UI elements. I am able to guide users through complicated web applications while making them appear simple on the surface. I'll soon be making the same kind of adjustments to sustainable technologies, I'm just wondering how easy it's going to be.

Wednesday, September 16, 2009

Class Projects SDN604: Trying to Re-Use Odd By-products

One of the more interesting elements of my SDN604 class, Intro to Green Materials, is the professor giving us odd by-products and asking us to work with them. Our current project is the foam cutouts of the 50-state commemorative quarters presentation foam boards.

So now I have a plethora of blue foam quarters to work with. Impossible! After thinking of multiple uses and possibilites, I was leaning towards some kind of shoe sole. Knowing that there would already be a better product on the market, maybe the best opportunity would be to design a low-cost shoe for developing nations. While tinkering with a sole design, I just couldn't get it right. We would have to stack them a few inches tall just to get the proper support, forcing me to drop the idea.

Over the next few days I spent time talking with different people, trying to find an actual use for this weird product. The idea of a packaging/moving wrap came along. Small stacks sandwiched between two sheets of Tyvek should protect fragile items during transit while keeping them waterproof.

After gluing stacks of 3 coins together, we were able to have a substantial amount of impact resistance. Then we needed to space them out appropriately so that the wrap was still very flexible. Here's what our product turned out like:

Let me know what you think or if you have any better ideas.

Wednesday, September 9, 2009

A Few Weeks Into Classes

So just like that and we're three weeks into the first semester. My two courses are both lectures; Sustainable Design (SDN) 604 - Design of Green Materials on Tuesday afternoons with professor Chris Pastore, and Thursdays I have SDN 601- Sustainable Design Methodologies with professor Rob Fleming. Both require extensive out of class readings and research, but they both are opening my eyes to a lot of concepts and ideas I haven't thought of before.

One point that professor Flemming pointed out that has resonated with me is that we are coming out of the age of trying to maximize human productivity, and now business and industry is shifting into focusing on resource productivity. Imagine 200 years ago telling people that you would soon be able to do the work of 70 men with ease because of the advancements of technology. You would be laughed at - but we know today that we exponentially increased our capacity for human productivity. So looking forward, we need to make those same advancements with resource productivity through technology.

One last thing, each of the professors have websites that they upload material and projects to - and man are they ugly. I can't even read the text for my 604 class. I might design a better site for the benefit of all.

Friday, August 21, 2009

PhillyU MSSD Meet and Greet

Last night I went down to the PhillyU Meet and Greet for the incoming MS Sustainable Design Students. It was held in the Engineering and Design Institute in the downtown Manayunk section of Philadelphia, and this is where the majority of my time will be spent. I believe there are 48 incoming students; 20 part-time like myself, and 28 full-timers. The professors and directors introduced themselves and answered questions, all of them seem very in tuned to where the program is heading and what we are trying to accomplish. It's going to be very exciting! I'm really looking forward to seeing how I can contribute to the program. Classes start Aug 25th.
PhillyU: The Engineering and Design Institute

Tuesday, August 11, 2009

Re-using Old Cabinets

Over the past two weeks, I've been helping my friends Joe and Nicole pull out their old kitchen cabinets. The units are around 30 years old and have a pretty basic design. There were enough cabinets for me to divide them into two groups; a small rental unit kitchen (one of my Dad's properties), and the other group will go towards the prep area at the lounge in Lancaster. With some paint and new hardware, I really think these are going to turn out beautifully. Score: 4 (I mean what can be better than straight up recycling?)

Monday, July 20, 2009

Forms Removed From Concrete Counters

This past weekend I removed the forms from the concrete counters. I think they look great for my first time doing this. We ordered a variable speed wet grinder that should be here before next weekend, and that will give it a finished look. It's pretty amazing thinking about the cost for these compared to granite or other options. When this is said and done, total cost for materials is around $500.
I'll give this project a score when it's completed, as I want to do a detailed wrap-up.

Tuesday, July 7, 2009

Assigning a Score to My Projects

I've taken notice that most of my posts are following established building practices, because honestly that's what I know and am comfortable doing. This is, in fact, supposed to be my documentation of my journey into sustainable building practices; Using new materials and going the extra step to ensure I'm being efficient and eco-friendly as possible. So from this point forward, I'll be rating my posts and projects with a Sustainable Score from 1-5. 5 being very sustainable, like me installing solar panels and green roofs, and 1 being the opposite, like me gutting a house and not recycling anything. So feel free to tell me if you agree with my scores or if you think I could go about things differently.

Monday, June 29, 2009

Creating Custom Counters

We're starting to see the light at the end of the tunnel in Lancaster. This past weekend I framed sturdy counter shelving for the front cafe area. The plan is to hand pour concrete counter tops. I've taken many photos of the supports and it's as solid as it gets. The surface will be a 2" thick slab and 3" on the edges, creating a lip around the supporting plywood to give it a contemporary and modern look. Also, I have a recessed area to secure a cash register. I'll steel trowel and then stone smooth the tops before giving it a final water-seal stain.

Here are photos of my frames before we pour. Notice how the lip goes around all of the edges and will produce a very angular and square product.


I was looking online for a good tutorial for step-by-step instructions on something like this and didn't come across anything great. I'm considering taking video of the forms and the process involved and hopefully it will help someone else make (granted this turns out nice).

For the face of the counters I plan on punching holes for lighting, using under-cabinet lighting facing outward. In front of them, I'll put squares of wood contrasting in color and spaced apart from the face, so light will spill out around it. It will match the existing lighting in the property and should really add some character. The cost isn't bad either, $40 for the lights, and another $20 for the wood squares and 1/2" PVC pipe (will cut into 2" pieces and use as spacer with a screw in the middle.

Tuesday, June 23, 2009

Review of 2009 DVGBC Green Home Tour

This past Saturday was the DVGBC Green Home Tour. Around 30 people were in attendance, most of them being in the DVGBC. We visited, in order, Bancroft Green, Montrose Green, and the Thin Flats.

Here are my thoughts on each:
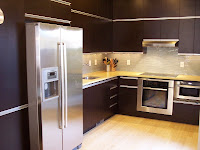
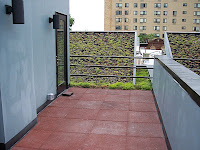
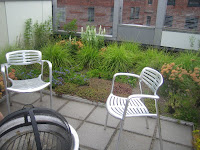

Bancroft Green:
Key features: Geothermal heating and cooling, dual flush toilets, small green roof, rooftop patio, bamboo floors, energy star appliances.

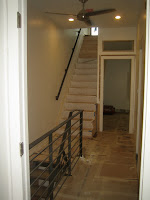
Upon entering the 4 story units (basement included), it had a light and modern feel. Bamboo floors, modern cabinetry, the standard stuff. The landing is elevated from the kitchen, dividing the space, and giving more headroom and sunlight into the basement. The build quality was well done, using insulated concrete panels for the basement, and all of the finishes were very nice.

However, because of the narrow hallways and all of the walls dividing the spaces, the whole property felt a bit crammed. Nothing about the architecture or layout seemed overly innovative, and it had a very yawn feeling to it. The whole unit lacked defining character, character which we could easily see on the other two homes. It was easy to see that the Bancroft Green builders took a few common green elements, and added them to your 500k townhouse.

Bancroft Green photos: taken from http://picasaweb.google.com/BancroftGreen
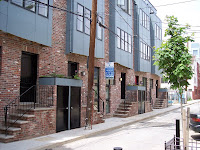
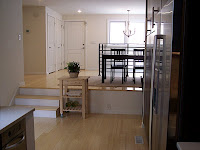
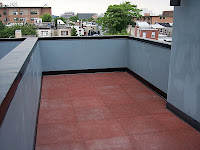
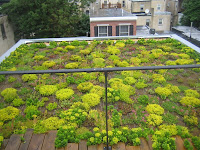
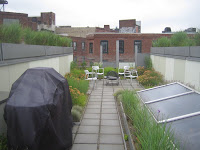


Montrose Green
Key features: FSC Certified Woods & Recycled Metals, Spacious Green Roof with small deck, Rain Water Harvesting system, passive ventilation design, No- and Low-VOC Paints & Stain, Soy Based Spray Foam insulation, energy star appliances, Low Flow Faucets and Fixtures and more...

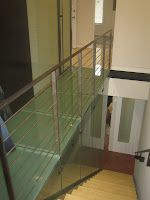
From the street the unit stand out as the only one with a 3rd story, and it being a silver colored addition makes it stand out even more. Stepping into this updated rowhome, you can feel the richness and character of the old building coming through. The exposed brick, and newly-installed steel handrails and staircase, give the home an industrial, aged look. They went with a deep cherry for the floors, which matches the windows and stairs. You can look up the stairs all the way to the 3rd floor and right out a window with a whole house fan for air ventilation. The second floor has spacious hallways, two large bedrooms, and a beautiful bath with subway tile. The 3rd floor is a master suite with an office and a narrow stairway to the rooftop.

Coming away from this house, you can really feel the hard work that went into everything they've done. The architects are working on site and were easy to talk to. (I met Chris as the Go Green Expo a few months ago)

Photos from Montrose Green:
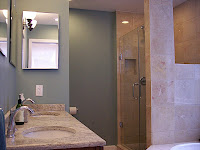


Thin Flats
Key features: LEED Homes Platinum Certification, solar thermal panels, radiant floor heating, green roofs, FSC certified flooring, Low Flow Faucets and Fixtures, Fly Ash Concrete, No- and Low-VOC Paints & Stain, and more...

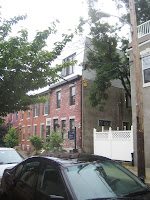
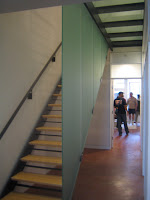
Approaching the Thin Flats, it screams for attention. Very sharp contrasts with the steel and glass and colorful paint. Located on a narrow street, the Onion Flats team really had to squeeze every inch possible out of the lot. Upon entering, we were greeted by Johnny McDonald. He talked in length about the challenges and benefits of seeking LEED Platinum. The properties are actually divided into 2-unit condo associations, lowering insurance costs and dues.

The most striking architectural element in the Thin Flats is the illuminated bathroom adjacent to the kitchen that they call the "Lantern". Completely surrounded by frosted glass, light flows in during the day, and out during the evening, providing a soft glow for both floors. The main hallway floor on the upper level is made of frosted glass, so light will shine through, opening the space even more. This project is on the cutting edge of sustainable, energy efficient, and smart design.

Photos from the Thin Flats:


The tour was a lot of fun, it's a shame there weren't more students. Most of the tour-goers were 50+ years of age and were probably established builders or industry professionals. Unfortunately, I didn't take much time to make many contacts like I had hoped. I should have been more outgoing. I'm looking forward to running into these builders and architects in the near future.